
Authorization answers the question: What can a user do once they’ve successfully logged in? Logging into a system doesn’t mean unrestricted access. Instead, authorization ensures that users can only access what’s necessary for their role.
Traditional role-based access systems (RBAC) were once baked directly into the application layer. Fortunately, we now have alternatives that solve authorization at scale. Modern authorization systems, such as those inspired by Google’s Zanzibar paper and implemented by projects like AuthZed, distribute authorization decisions across clusters of machines.
AuthZed is a modern authorization infrastructure platform that enables engineering teams to stop building custom authorization stacks and instead adopt a scalable, consistent, fine-grained access control system across any application. AuthZed provides both managed cloud authorization services and an open-source authorization engine (SpiceDB), designed to power authorization at scale and with strong semantic flexibility.
What Is AuthZed?
AuthZed is a platform focused exclusively on authorization. While authentication verifies identity, authorization decides access rights for resources once identity is known. AuthZed centralizes, unifies, and scales this core security layer so developers don’t have to implement their own permission logic in every application.
At its core, SpiceDB is behind the authorization model provided by all of AuthZed’s products. It is designed to be entirely agnostic to authentication solutions and identity providers. SpiceDB implements a relationship-based permissions model that supports strong consistency, global replication, and extremely high scale, processing millions of authorization requests per second for modern, distributed apps. SpiceDB is a graph engine that centrally stores authorization data (relationships and permissions). Authorization requests (e.g., checkPermission, lookupResources) are resolved via a dispatcher that traverses the permission graph.
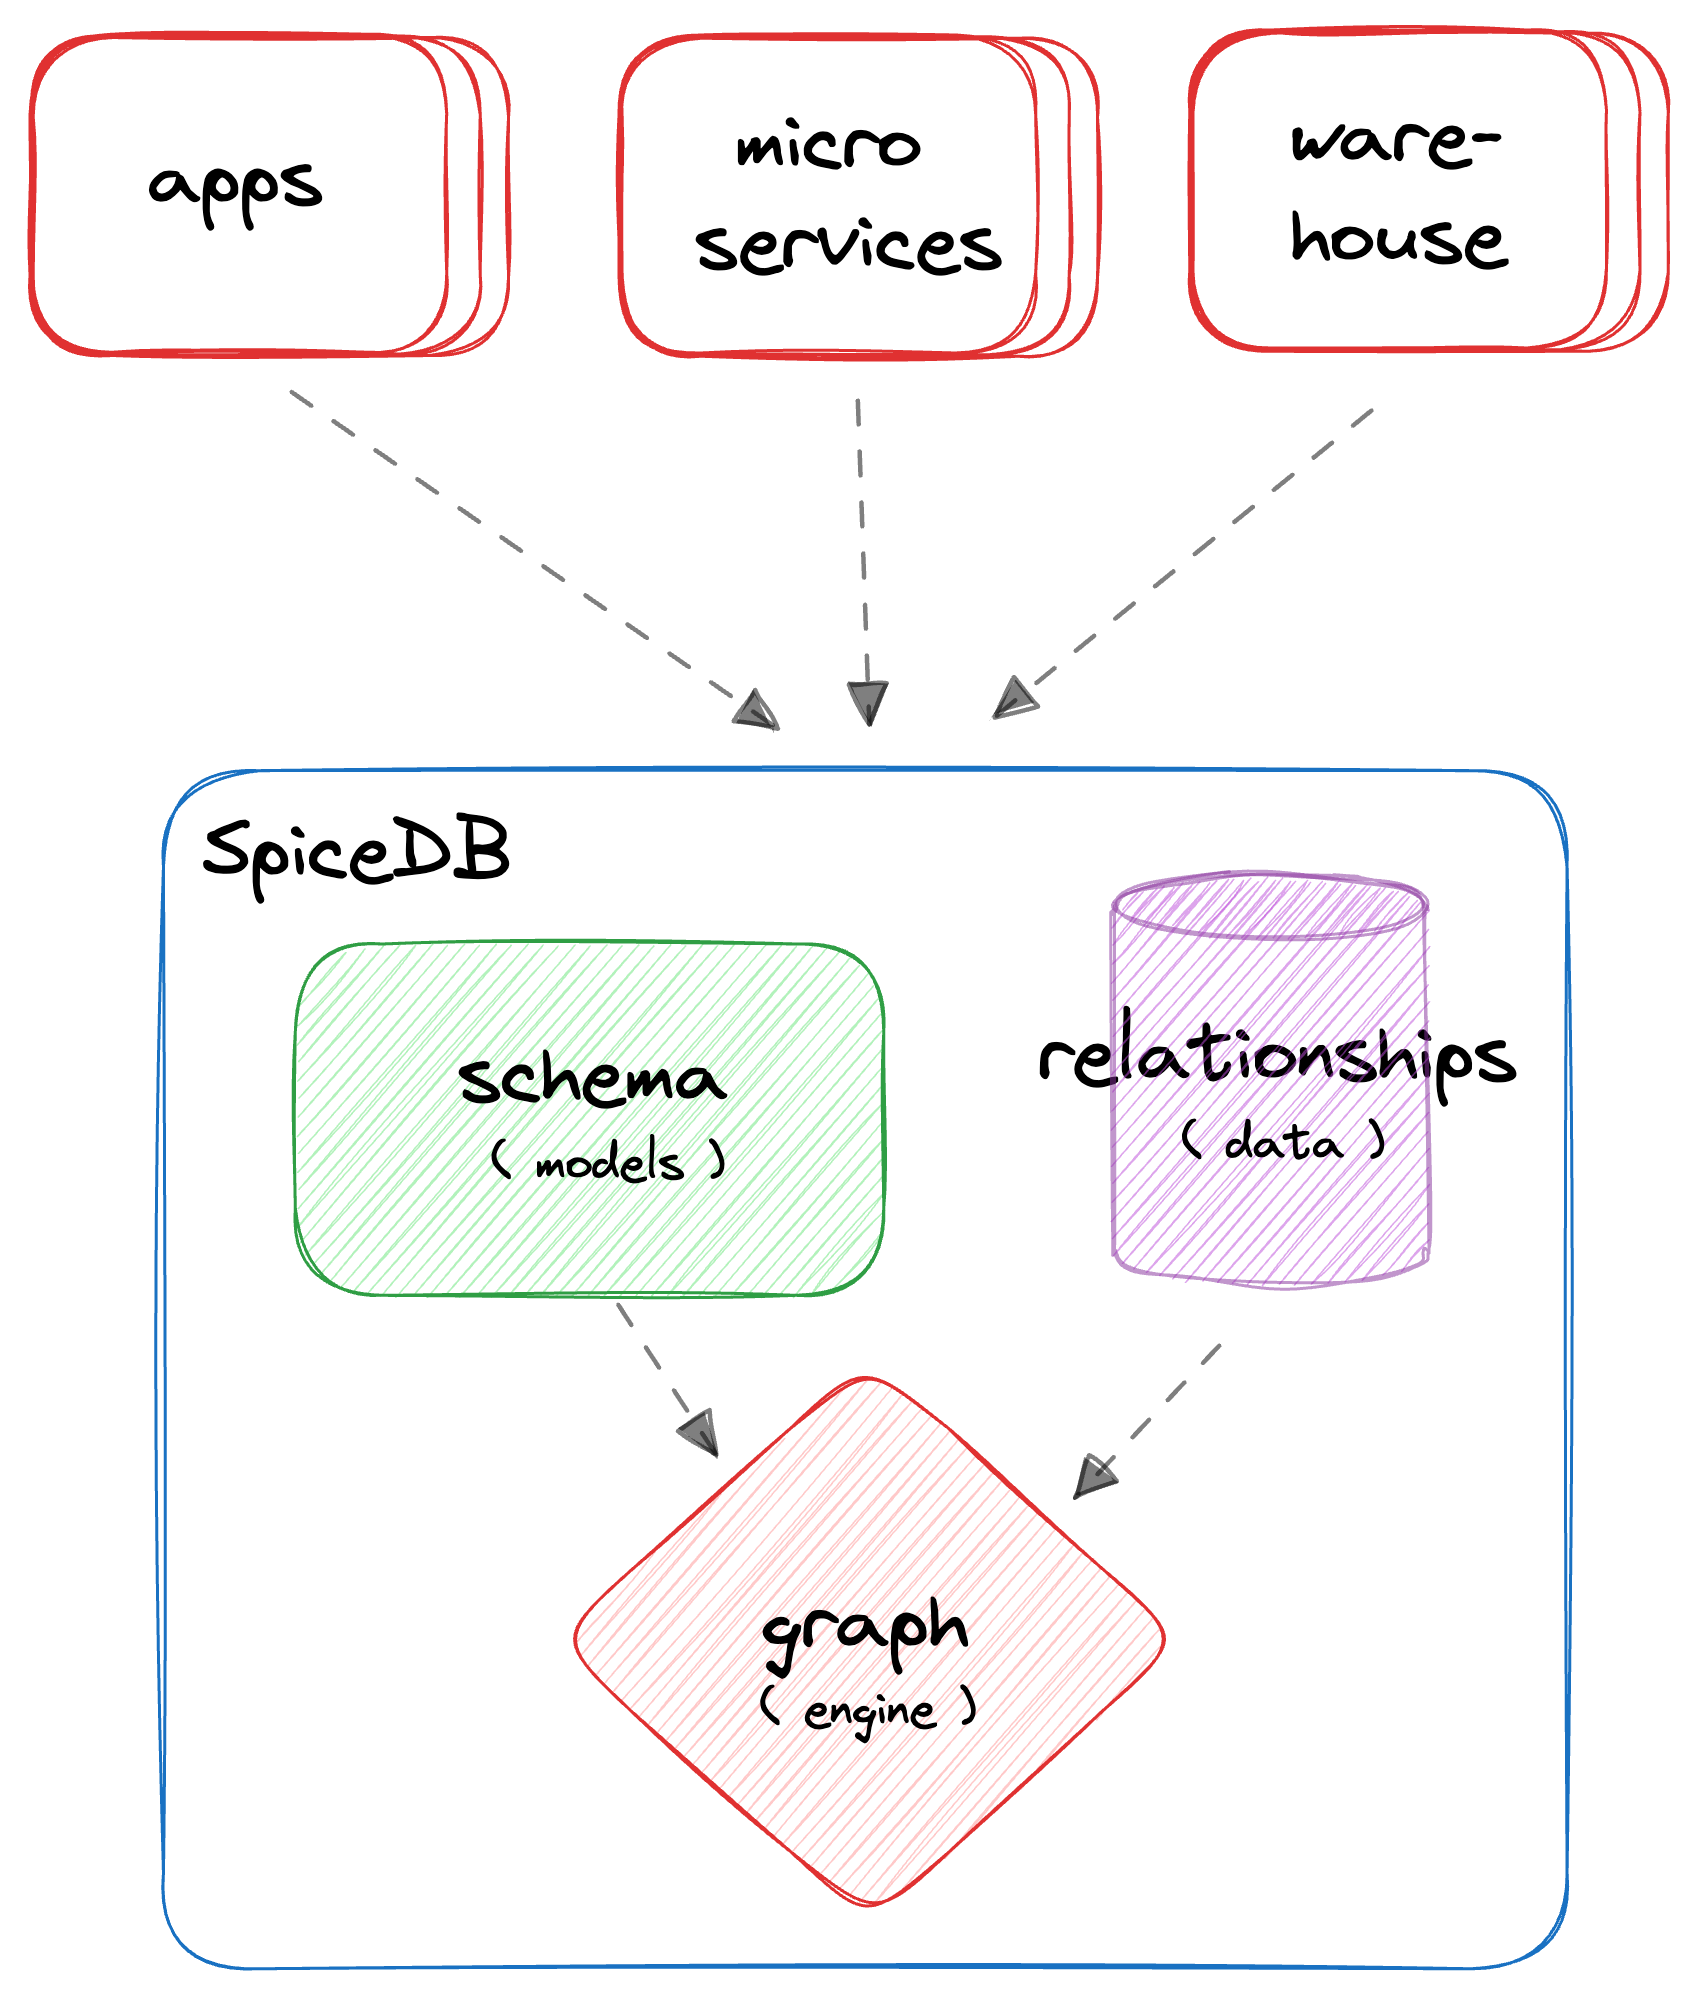
SpiceDB permission graph engine
AuthZed’s mission is to:
- Eliminate fragmented, application-specific authorization logic
- Provide a single system of record for permissions and access policies
- Deliver enterprise-grade performance and consistency across distributed environments
- Support complex, evolving access control requirements without rewriting code
Why Use AuthZed?
Modern applications and distributed systems require fine-grained, flexible, and scalable authorization. Traditional Role-Based Access Control (RBAC) built into applications can be brittle, inconsistent, and hard to maintain at scale. That model collapses under global scale, where:
- Users exist across multiple data regions
- Permissions depend on dynamic relationships between entities
- Permission evaluation requires context from several data sources
For all these, AuthZed offers:
- Centralized authorization for all services and applications
- Permission evaluation at scale with low latency
- Consistency guarantees across distributed systems
- Flexible relationship-based access control (ReBAC) that supports complex business policies
- Cloud-hosted or self-managed deployment options to fit your needs
Where Can AuthZed and CockroachDB Win Together?
AuthZed has chosen CockroachDB as the underlying datastore for both AuthZed Dedicated and AuthZed Cloud.
In the world of authorization, uptime and resiliency are essential. CockroachDB allows AuthZed and SpiceDB deployments to survive a node, AZ, or region outage with zero downtime.
CockroachDB was built around this principle: its serializable isolation model provides the strongest transactional consistency guarantee in SQL (not “eventual,” not “read-committed,” but linearizable across a global cluster). That same property is what emerging authorization systems are now chasing, but for policy instead of data. That’s why SpiceDB uses CockroachDB as the underlying datastore. With this design, it gains a globally distributed, strongly consistent SQL foundation.

AuthZed and CockroachDB architecture
CockroachDB’s multi-region replication and high availability ensure that authorization decisions are consistent, low-latency, and resilient across geographies. This architecture combines SpiceDB’s flexible, API-first authorization model with CockroachDB’s fault-tolerant database platform to deliver secure, fine-grained, and strongly consistent access control that scales to enterprise workloads worldwide.
Additionally, CockroachDB’s multi-active architecture allows AuthZed and SpiceDB deployments to scale writes horizontally. AuthZed has been able to scale real-world deployments to tens of thousands of writes per second.
Set Up a Joint CockroachDB/AuthZed Environment
We’ll show how CockroachDB can serve as the source of truth for data and policy consistency by modeling a global project management app with authorization checks powered by AuthZed.
Imagine building a global content management application that uses SpiceDB as the access control system, backed by CockroachDB across multiple regions.
Prerequisites
To execute this scenario you’ll need:
- A secure, reachable CockroachDB cluster (self-hosted or Cloud), a current supported CRDB version, and network access from your SpiceDB runtime to port
26257 - A dedicated database
spicedband user for SpiceDB, with enough privileges to run its migrations and operate normally
Step 1. Provision a CockroachDB Cluster
Choose one of the following methods to create a new CockroachDB cluster, or use an existing cluster and skip to Step 2.
Note: Be sure to create a secure cluster. This is necessary for the user creation step of this tutorial.
Create a secure cluster locally: if you have the CockroachDB binary installed locally, you can manually deploy a multi-node, self-hosted CockroachDB cluster on your local machine.
Create a CockroachDB Self-Hosted cluster on AWS: deploy a multi-node, self-hosted CockroachDB cluster on Amazon EC2 using AWS’s managed load-balancing service.
Create a CockroachDB Cloud cluster: CockroachDB Cloud is a fully-managed service run by Cockroach Labs. Sign up and create a cluster using trial credits.
Step 2. Create a Database for AuthZed
Before integrating AuthZed with CockroachDB, set up a dedicated database.
Connect to your CockroachDB SQL client:
cockroach sql --certs-dir={certs-dir} --host={crdb-fqdn}:26257
Create the database:
CREATE DATABASE spicedb;
Create a user and grant privileges:
CREATE USER authz WITH PASSWORD 'securepass';
GRANT ALL ON DATABASE spicedb TO authz;
Step 3. Install SpiceDB Binaries
Install the SpiceDB binary:
sudo apt update && sudo apt install -y curl ca-certificates gpg
curl https://pkg.authzed.com/apt/gpg.key | sudo apt-key add -
sudo echo "deb https://pkg.authzed.com/apt/ * *" > /etc/apt/sources.list.d/fury.list
sudo apt update && sudo apt install -y spicedb
Run the SpiceDB schema migration:
spicedb datastore migrate head \
  --datastore-engine=cockroachdb \
  --datastore-conn-uri="postgres://authz:securepass@CRDB_URI:26257/spicedb?sslmode=disable"
Start the SpiceDB service:
spicedb serve \
  --grpc-preshared-key="<preshared_key>" \
  --http-enabled=true \
  --datastore-engine=cockroachdb \
  --datastore-conn-uri="postgres://authz:securepass@CRDB_URI:26257/spicedb?sslmode=disable"
Install the zed CLI (AuthZed’s command-line tool):
brew install authzed/tap/zed
Connect the CLI to your SpiceDB instance. For local development, use the --insecure flag. Use the same preshared_key you used in the spicedb serve command:
zed context set my_context <SpiceDB_IP>:50051 <preshared_key> --insecure
Verify the connection:
zed version
When successfully connected, you should see:
client: zed v0.31.1
service: v1.45.4
If the server version shows as “unknown”, check your preshared_key, IP address, and port.
Test the CockroachDB/AuthZed Integration
Once both CockroachDB and AuthZed are provisioned, configured, and network-accessible, validate that all components work together as intended.
1. Define the Schema
Writing one or more object type definitions is the first step in developing an authorization relationship schema.
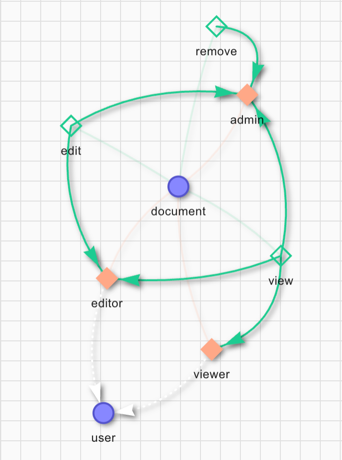
SpiceDB schema definition diagram
In the example above, we define the user and document concepts. The user can be a viewer, an editor, or an admin. The definition gives the remove permission to the admin role only. To edit a file the user must be either an editor or admin. The permission to view a document is set for the viewer, editor, and admin roles.
definition user {}

definition document {
    relation editor: user
    relation viewer: user
    relation admin: user

    permission view = viewer + editor + admin
    permission edit = editor + admin
    permission remove = admin
}
Save the schema as schema.zed and write it to SpiceDB:
zed schema write ./schema.zed
Verify it was saved:
zed schema read
You can also write the schema via the REST API:
curl --location 'http://<SpiceDB_IP>:8443/v1/schema/write' \
--header 'Content-Type: application/json' \
--header 'Accept: application/json' \
--header 'Authorization: Bearer <preshared_key>' \
--data '{
"schema": "definition user {} \n definition document { \n relation editor: user \n relation viewer: user \n relation admin: user \n permission view = viewer + editor + admin \n permission edit = editor + admin \n permission remove = admin \n}"
}'

# output:
# {"writtenAt":{"token":"GhUKEzE3NTgxMjkyOTM0MDE2MDYxNDA="}}
2. Create Relationships
In SpiceDB, relationships are represented as relation tuples. Each tuple contains a resource, a relation, and a subject. In our case the resource is the name of a document, the relation is either admin, viewer, or editor, and the subject is the name of a user.
Let’s simulate a new content creation flow: user amine creates a new document doc1 and becomes its admin, meaning he can view, edit, and remove it. User jake gets the viewer role for doc1:
zed relationship touch document:doc1 admin user:amine
zed relationship touch document:doc1 viewer user:jake
You can also use the REST API. To add user evan as editor of doc1:
curl --location 'http://<SpiceDB_IP>:8443/v1/relationships/write' \
--header 'Content-Type: application/json' \
--header 'Accept: application/json' \
--header 'Authorization: Bearer <preshared_key>' \
--data '{
    "updates": [
        {
            "operation": "OPERATION_TOUCH",
            "relationship": {
                "resource": {
                    "objectType": "document",
                    "objectId": "doc1"
                },
                "relation": "editor",
                "subject": {
                    "object": {
                        "objectType": "user",
                        "objectId": "evan"
                    }
                }
            }
        }
    ]
}'

# output:
# {"writtenAt":{"token":"GhUKEzE3NTgxMjk3MDg2NTc4MDQ5ODk="}}
3. Check Permissions
To verify the schema is working correctly, issue permission check requests. As jake is only a viewer for doc1, we expect him to have the view permission but not edit or remove:
zed permission check document:doc1 view user:jake
# output: true
zed permission check document:doc1 edit user:jake
# output: false
You can also check permissions via the REST API. Let’s verify that jake doesn’t have the remove permission on doc1:
curl --location 'http://<client IP>:8443/v1/permissions/check' \
--header 'Content-Type: application/json' \
--header 'Accept: application/json' \
--header 'Authorization: Bearer <preshared_key>' \
--data '{
  "consistency": {
    "minimizeLatency": true
  },
  "resource": {
    "objectType": "document",
    "objectId": "doc1"
  },
  "permission": "remove",
  "subject": {
    "object": {
      "objectType": "user",
      "objectId": "jake"
    }
  }
}'

# output:
# {"checkedAt":{"token":"GhUKEzE3NTgxMjk5NTAwMDAwMDAwMDA="}, "permissionship":"PERMISSIONSHIP_NO_PERMISSION"}
Conversely, as amine is an admin, we expect him to have all permissions:
zed permission check document:doc1 view user:amine
# output: true
zed permission check document:doc1 remove user:amine
# output: true
zed permission check document:doc1 edit user:amine
# output: true
4. Access AuthZed Data with CockroachDB SQL
In your CockroachDB SQL client, run the following query to verify the accessibility of the AuthZed schema in CockroachDB:
SELECT namespace, serialized_config FROM public.namespace_config;
The result set contains data about the permission schema:
-[ RECORD 1 ]
namespace         | document
serialized_config | \x0a08646f63756d656e74...

-[ RECORD 2 ]
namespace         | user
serialized_config | \x0a04757365722200

Time: 4ms total (execution 4ms / network 0ms)
Then run the following query to verify the accessibility of AuthZed access control data using CockroachDB:
SELECT namespace, object_id, relation, userset_namespace, userset_object_id, timestamp, expires_at
FROM public.relation_tuple;
The result set contains permissions data matching the relation tuples you created:
  namespace | object_id | relation | userset_namespace | userset_object_id |         timestamp          | expires_at
------------+-----------+----------+-------------------+-------------------+----------------------------+-------------
  document  | doc1      | admin    | user              | amine             | 2026-01-06 18:28:21.12613  | NULL
  document  | doc1      | editor   | user              | evan              | 2026-01-06 18:29:40.131476 | NULL
  document  | doc1      | viewer   | user              | jake              | 2026-01-06 18:28:23.226998 | NULL
(3 rows)

Time: 4ms total (execution 3ms / network 0ms)
Next Steps
The tests above confirm that each AuthZed component in this deployment is properly connected using CockroachDB as the shared data layer. You can now begin building authorization and access control features with CockroachDB and AuthZed.