
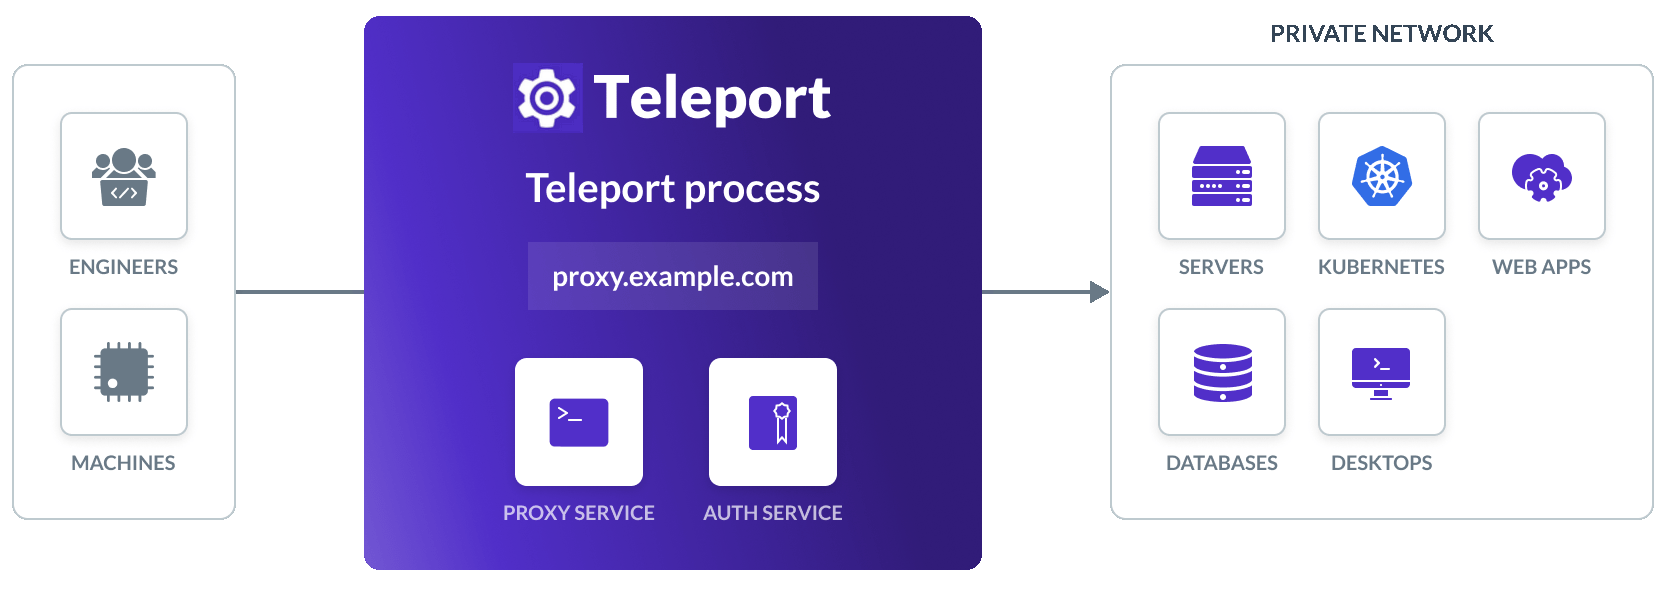
Teleport is a certificate authority and identity-aware access proxy that implements protocols such as SSH, RDP, HTTPS, Kubernetes API, and a variety of SQL and NoSQL database protocols. It is completely transparent to client-side tools and designed to work with everything in today’s DevOps ecosystem. When paired with CockroachDB as its persistent data store, you get a fully scalable, resilient infrastructure access platform capable of operating across regions without complex data migrations or single points of failure.
What Is Teleport?
Teleport is an access plane that consolidates and secures access to all types of infrastructure environments. It is designed to replace a patchwork of SSH bastions, VPNs, identity providers, and access proxies while providing a single, unified platform.
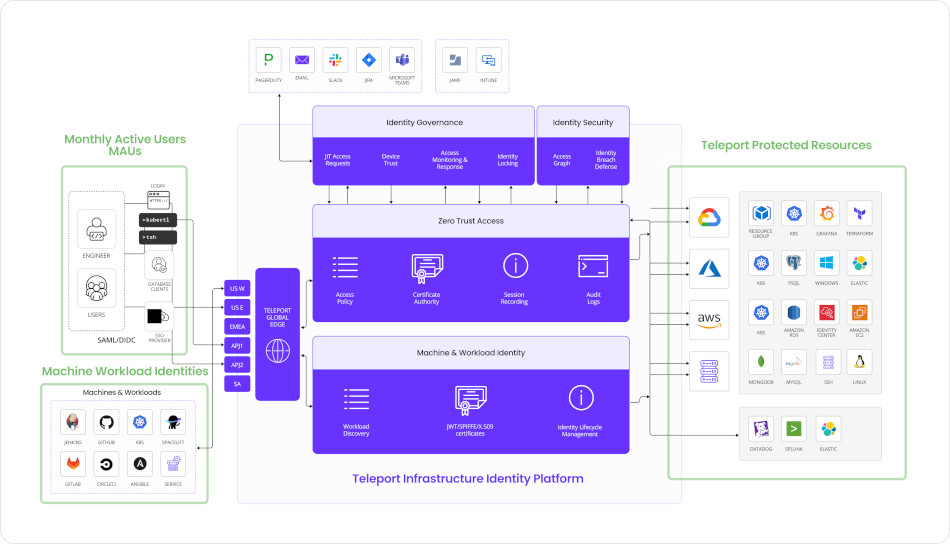
Teleport Identity Platform
Certificate-Based Authentication
Certificate-based authentication is the most secure form of authentication, but historically, it has been the most complicated to manage. Teleport securely automates certificate issuance, making certificate-based authentication easy. Teleport operates a number of internal Certificate Authorities (CA). Each certificate is used to prove identity, cluster membership, and manage access. Admins can configure a time to live (TTL) for certificates, and rotate CAs to invalidate previously issued certificates.
Clients authenticate with Teleport and receive a client certificate, which automatically works for all resources protected by Teleport. After authentication, the ssh, kubectl, psql, mysql and other remote access commands will be configured with the user’s identity. Teleport offers a built-in database for user management, and for production use, you can integrate it with enterprise SSO based on Okta, GitHub, Google Workspace, Active Directory, and other identity providers.
Why Teleport?
Teleport offers:
- Identity-based access using SSO (SAML, OIDC, GitHub, etc.)
- Short-lived certificates for all access (no static keys or passwords)
- Comprehensive auditing of all activity, including session recordings
- RBAC and ABAC policies for fine-grained access control
- Multi-protocol support, including SSH, Kubernetes, databases (PostgreSQL, MySQL, MongoDB, CockroachDB), internal web apps, and Windows RDP
Teleport’s architecture is purpose-built for securing access to infrastructure in dynamic, distributed environments. Its minimal-agent architecture leverages standard protocols like SSH and HTTPS, simplifying deployment and eliminating the need for additional software on target systems. With certificate-based authentication and automatic certificate rotation, it removes the risks associated with long-lived credentials. Deep SSO integration with your internal identity provider ensures seamless, centralized authentication, reinforcing both security and operational efficiency.
Teleport’s architecture is built from the ground up with Zero Trust Security in mind — a model that assumes no implicit trust, even within the network perimeter. Instead of relying on IP addresses, VPNs, or trusted subnets, every request to infrastructure — whether it’s a Linux server, a database, or a Kubernetes cluster — is authenticated and authorized based solely on the user’s identity and role.
Teleport Architecture
Teleport Architecture
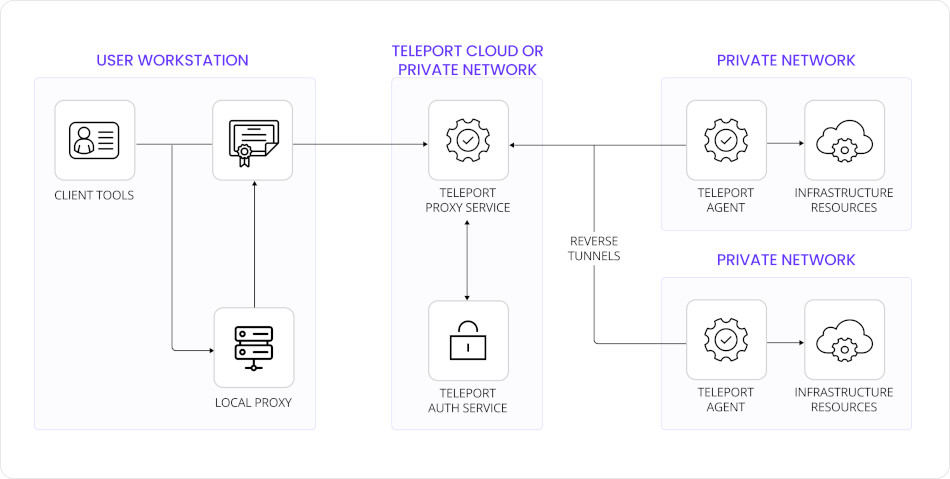
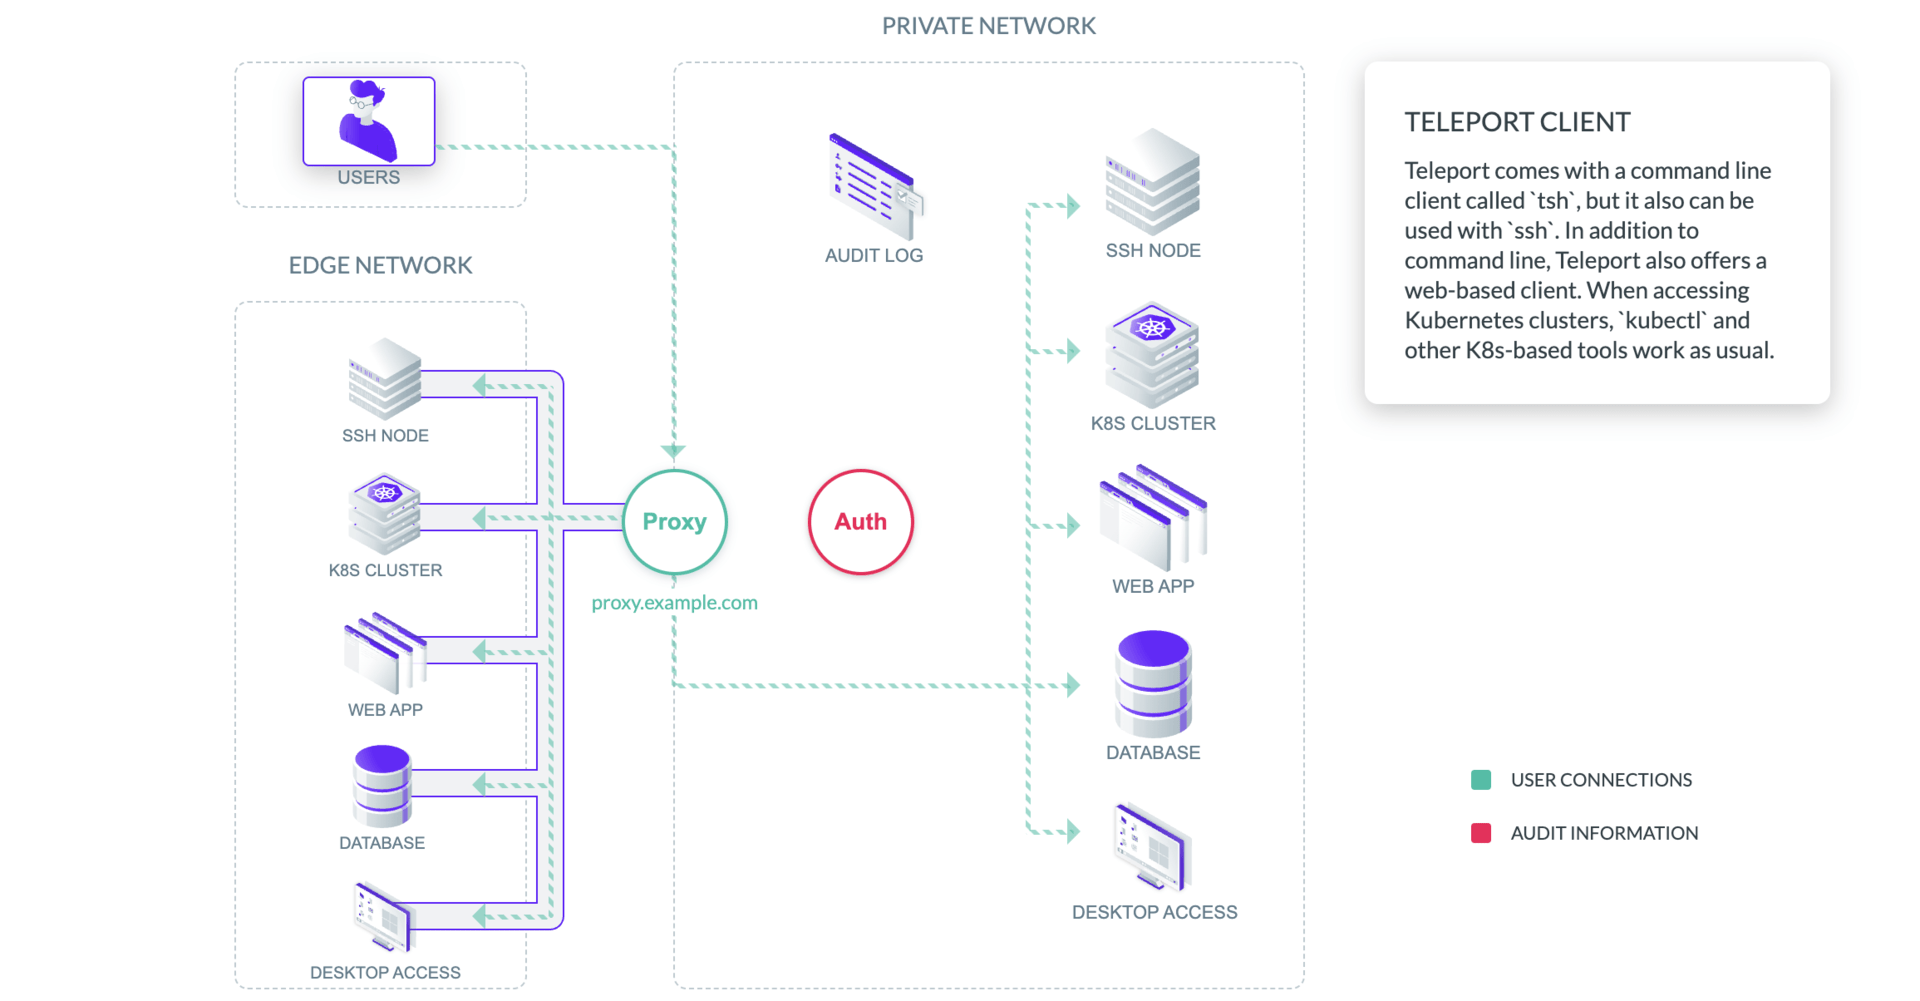
The key concept of Teleport’s architecture is the cluster. Users and servers must all join the same cluster before access can be granted. To join a cluster, both users and servers must authenticate. This model prevents honeypot attacks and eliminates the issue of trust on first use. Teleport clusters can be configured to trust each other, allowing users from one organization to access designated servers inside another organization’s environment.
A Teleport cluster consists of the following components:
Teleport cluster components
Teleport Auth Service
The certificate authority of the cluster. It issues certificates to users and Teleport services, and maintains an audit log. Key responsibilities include:
- Managing user and role definitions
- Issuing short-lived certificates for user and service authentication
- Storing session events, access requests, and audit logs
- Acting as the API for resource registration and access decisions
Because it is stateful and policy-driven, the Auth Server relies on durable, consistent storage backends. In multi-region deployments, these backends must be distributed and highly available while preserving strong consistency. This is where CockroachDB becomes a key enabler — ensuring that the Auth Server’s state is globally consistent and replicated across geographies.
Teleport Proxy Service
Allows access to cluster resources from the outside. Typically, it is the only service available from the public network. It routes client traffic to and from resources in your infrastructure:
- Performs reverse tunneling to internal nodes
- Proxies traffic for SSH, Kubernetes, databases, apps, and Windows RDP
- Enforces MFA and SSO integration
- Logs sessions for auditing and replay
This design ensures agentless, browser-based, and CLI-based access from anywhere in the world, without requiring inbound access or VPNs.
Teleport Agents
A Teleport Agent runs in the same network as a target resource and speaks its native protocol. Each agent connects a specific type of infrastructure to the cluster:
- node agent — connects Linux servers via SSH
- kube agent — integrates Kubernetes clusters using the Kubernetes API
- db agent — provides access to SQL/NoSQL databases like PostgreSQL, MySQL, and CockroachDB
- app agent — exposes internal HTTP applications behind secure SSO and session auditing
- windows agent — allows access to Windows servers over RDP (Enterprise)
Access for Edge Networks
Teleport allows users to access resources running on devices located anywhere in the world, including devices on third-party networks, servers behind NAT, or devices connected via a cellular connection.
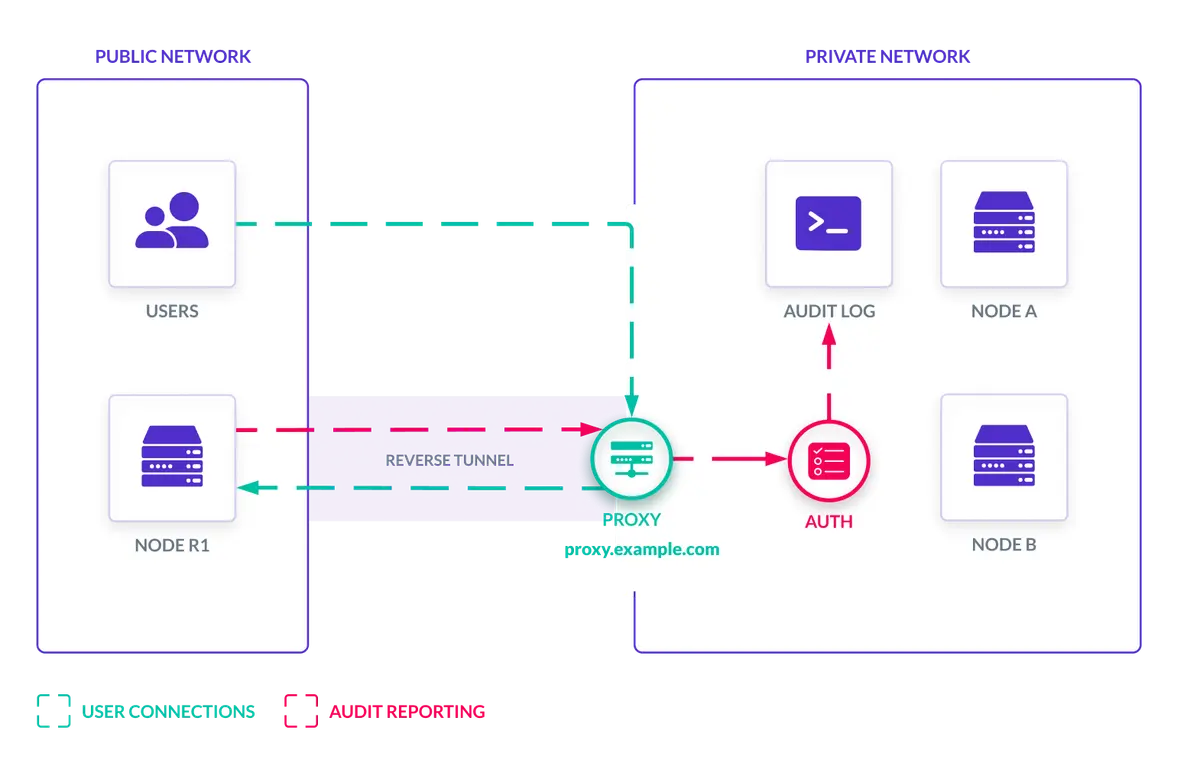
Teleport remote nodes via reverse tunnel
The underlying technology is reverse tunnels — secure connections established by an edge site into a Teleport cluster via the cluster’s proxy. This approach adheres to Zero Trust principles, where networks, including VPNs, are considered inherently untrustworthy. Reverse tunnels enable Teleport users to manage IoT devices via SSH, access Kubernetes clusters on the edge, access web applications on third-party networks, and reach CockroachDB databases in remote environments.
Audit Log
The Teleport Auth Service maintains an audit log of all activity inside the cluster, consisting of two components:
- The audit log — well-documented JSON records of security events such as login attempts, file transfers, code execution, and network activity.
- Recorded sessions — recordings of interactive sessions established via
ssh,RDP, andkubectl exec. Sessions can be replayed via a web interface with pause and rewind features.
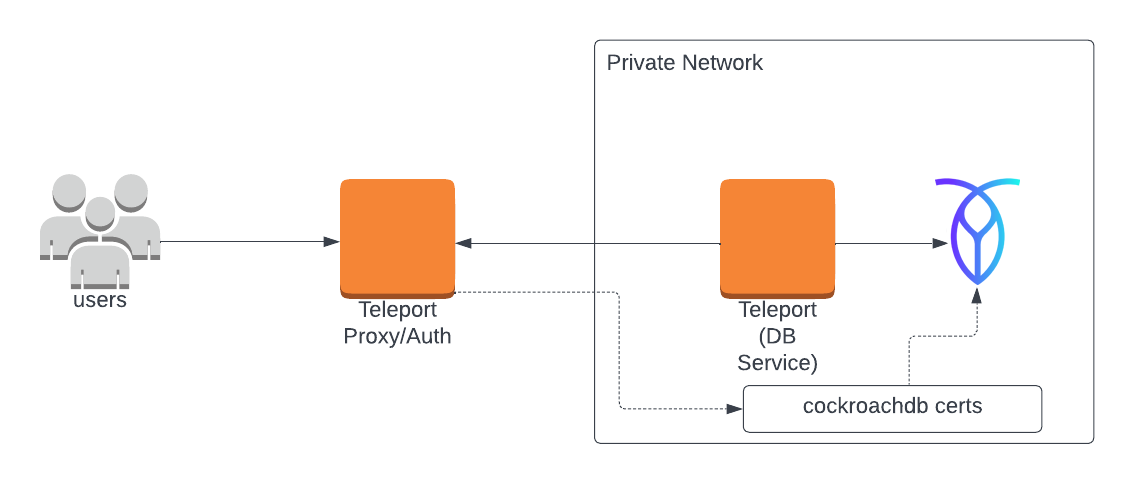
Teleport + CockroachDB Joint Architecture
To provide Tier 0 requirements, Teleport and CockroachDB offer a joint added value for multi-region resilience and consistency. This architecture enables active-active deployments of Teleport, ensuring that access infrastructure can survive network partitions, node failures, and global load — without compromising on security or compliance.
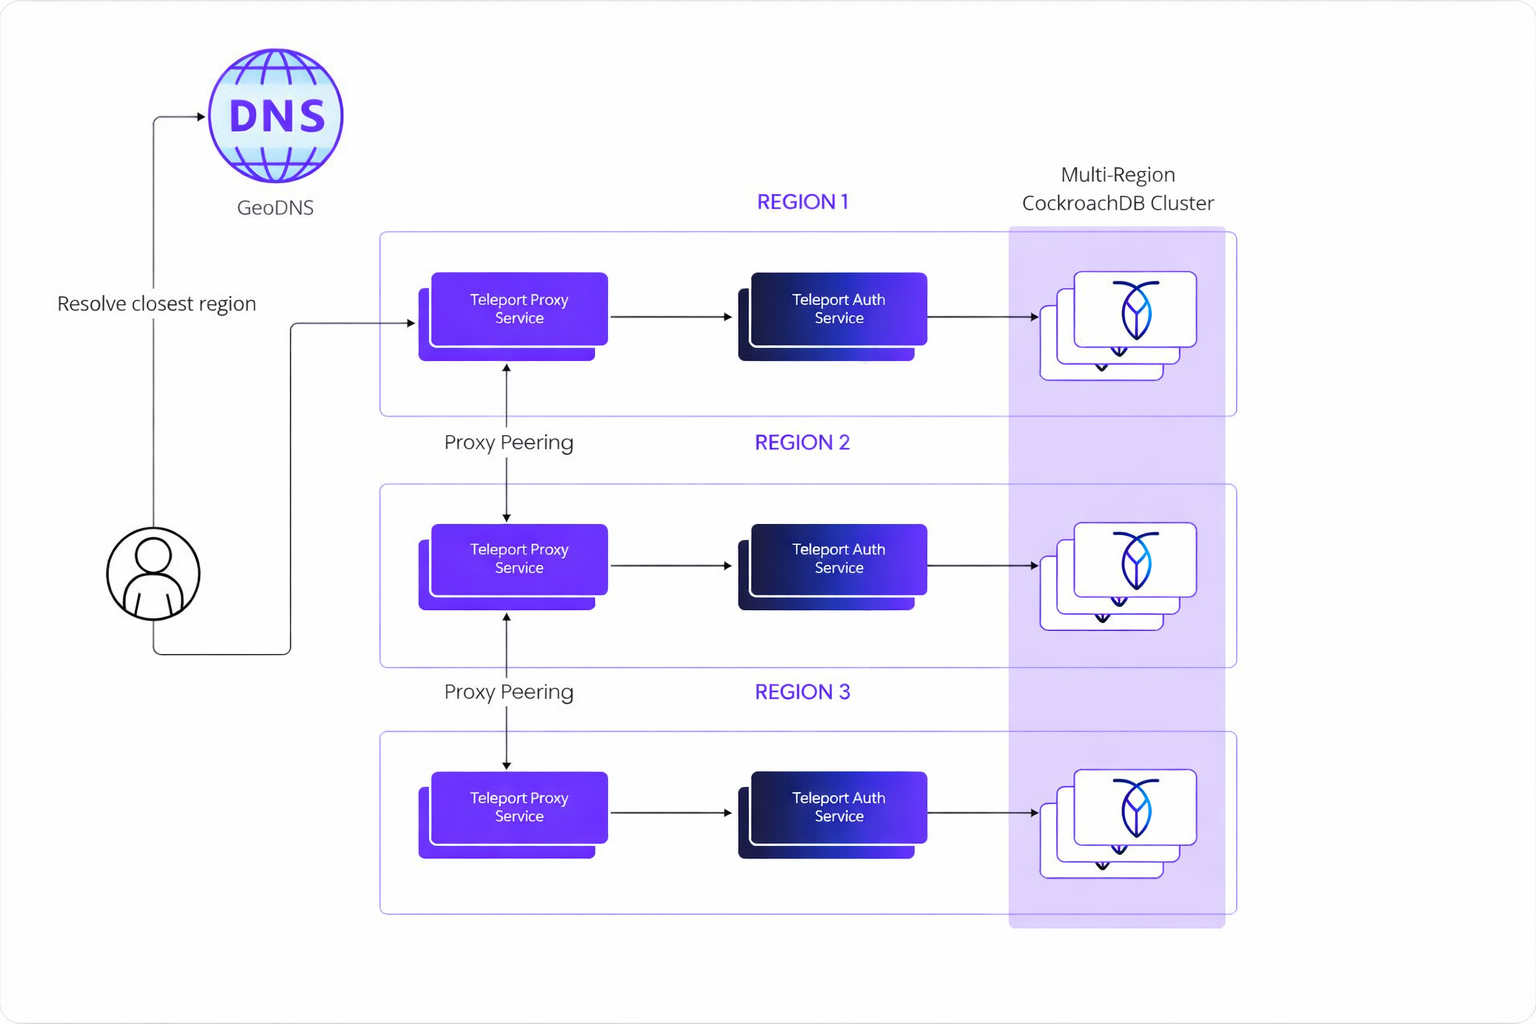
Multi-region Teleport and CockroachDB architecture
Each Teleport component relies on CockroachDB to store its state in a consistent and durable way, enabling correct operation even in the presence of partial outages or regional network partitions. The Teleport Auth Service is well-suited to operate with CockroachDB because of its stateless design and API-first philosophy: each service can be deployed as a stateless service with its only persistence requirement being the backing SQL database. This makes it straightforward to horizontally scale services, perform rolling updates, or deploy new regions without orchestrating complex data migrations.
CockroachDB distributed SQL foundation
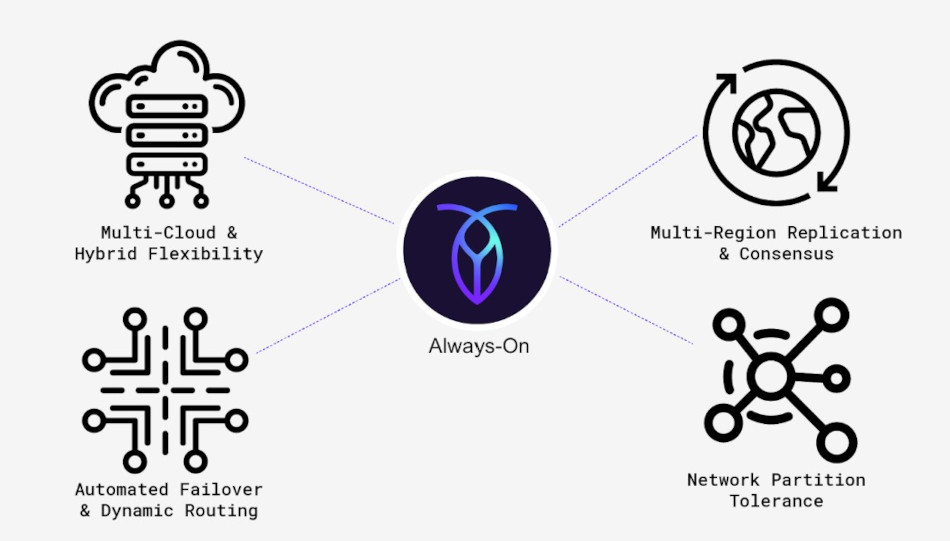
CockroachDB is a distributed SQL database designed for global scale and high availability. It replicates data across multiple regions while offering serializable isolation, strong consistency, and automated failover. Teleport officially supports CockroachDB as a storage backend for good reason:
- Built-in multi-region support — designed for geographically distributed deployments
- High availability — maintains consistency and uptime guarantees even during network partitions
- Horizontal scalability — scale reads and writes without sharding or manual intervention
- Data consistency — strong consistency by default ensures Teleport’s cluster state remains reliable across all regions
Set Up a Joint CockroachDB/Teleport Environment
This guide walks through a concrete, production-grade implementation using Teleport and CockroachDB in a multi-region deployment. In this architecture, CockroachDB plays two distinct roles:
- Teleport storage backend — persisting access control state, identity metadata, and session information.
- Teleport-protected resource — where access to a CockroachDB cluster itself is secured using Teleport’s Database Service.
Prerequisites
To run a multi-region Teleport deployment, you must have:
- 3 peered regional VPCs (e.g., on AWS) or 1 global VPC (e.g., on Google Cloud)
- 1 Kubernetes cluster in each region with non-overlapping Pod CIDRs
- A Teleport Enterprise license file
- A registered domain name and one subdomain per region (required for TLS verification)
- Pod mesh connectivity: Teleport Proxy Service instances must dial each other on port 3021
- A GeoDNS (e.g., Route53) with a geo-proximity routing policy
- A multi-regional CockroachDB cluster
- The
tctlandtshtools installed on a client host
Step 1. Provision a CockroachDB Cluster
Choose one of the following methods to create a new CockroachDB cluster, or use an existing cluster and skip to Step 2.
Note: Be sure to create a secure cluster. This is necessary for the following steps of this tutorial.
Create a secure cluster locally — if you have the CockroachDB binary installed locally, you can manually deploy a multi-node, self-hosted CockroachDB cluster on your local machine.
Create a CockroachDB Self-Hosted cluster on AWS — deploy a multi-node, self-hosted CockroachDB cluster on Amazon EC2 using AWS’s managed load-balancing service.
Create a CockroachDB Cloud cluster — CockroachDB Cloud is a fully-managed service run by Cockroach Labs. Sign up and create a cluster using trial credits.
Step 2. Set Up CockroachDB as a Storage Backend for Teleport
Connect to your CockroachDB SQL client:
cockroach sql --certs-dir={certs-dir} --host={crdb-fqdn}:26257
Create the database, user, and grants:
CREATE DATABASE teleport_backend;
CREATE USER teleport;
GRANT ALL ON DATABASE teleport_backend TO teleport;
Declare zones and regions, and configure regional fault tolerance:
ALTER DATABASE teleport_backend SET PRIMARY REGION <region1>;
ALTER DATABASE teleport_backend ADD REGION IF NOT EXISTS <region2>;
ALTER DATABASE teleport_backend ADD REGION IF NOT EXISTS <region3>;
ALTER DATABASE teleport_backend SET SECONDARY REGION <region2>;
ALTER DATABASE teleport_backend SURVIVE REGION FAILURE;
Note: If the primary and secondary regions are far from each other (e.g., on different continents), this will make CockroachDB write operations slower.
Sign a certificate for the teleport user:
cockroach cert create-ca --certs-dir=~/certs --ca-key=~/my-safe-directory/ca.key
cockroach cert create-client teleport --certs-dir=~/certs --ca-key=~/my-safe-directory/ca.key
This produces three files you will need in Step 3: client.teleport.crt, client.teleport.key, and ca.crt. For production, set up mutual TLS so that each node trusts other nodes’ certificates, Teleport trusts CockroachDB’s CA, and CockroachDB nodes trust client certificates signed by both your CockroachDB CA and the Teleport db_client CA (see Step 7).
Step 3. Provision Teleport on Kubernetes
Add the Teleport Helm repository:
helm repo add teleport https://charts.releases.teleport.dev
helm repo update
Create the teleport namespace and register the CockroachDB certificates as a Kubernetes secret:
kubectl create namespace teleport --dry-run=client -o yaml | kubectl apply -f -
kubectl config set-context --current --namespace teleport
kubectl create secret generic cockroach-certs \
  --from-file=ca.crt=~/certs/ca.crt \
  --from-file=client.teleport.crt=~/certs/client.teleport.crt \
  --from-file=client.teleport.key=~/certs/client.teleport.key \
  -n teleport --dry-run=client -o yaml | kubectl apply -f -
To run Teleport Enterprise, you need a license file. Navigate to your Teleport account dashboard and generate one:
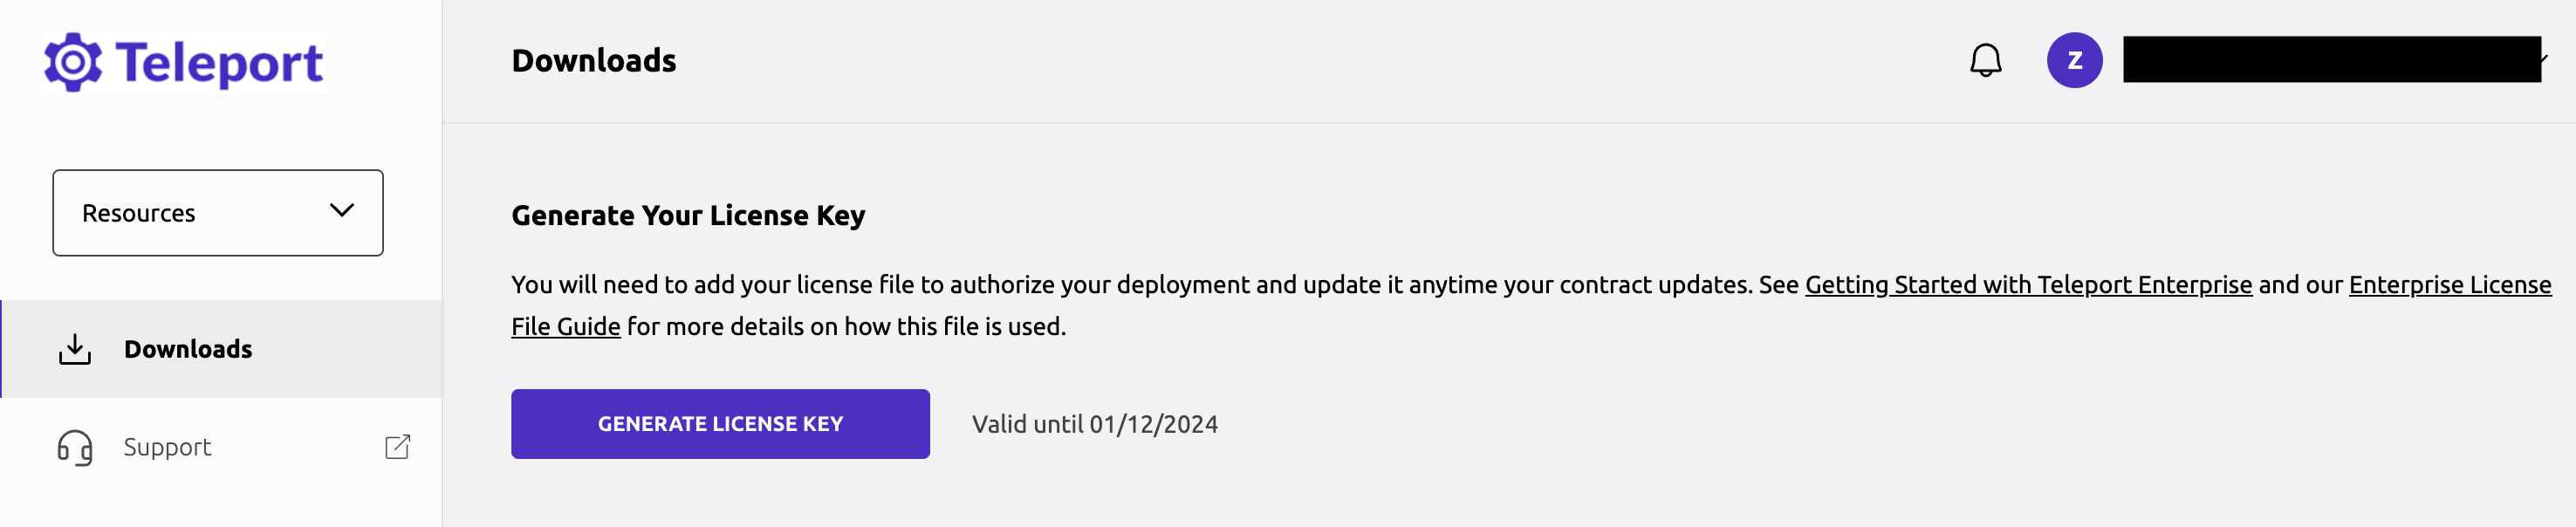
Teleport license generation
Create the license secret:
kubectl -n teleport create secret generic license --from-file=~/license.pem
Deploy Teleport via the teleport-cluster Helm chart using the following values file (create one per regional Kubernetes cluster):
chartMode: standalone
clusterName: ${CLUSTER_NAME}
enterprise: true
persistence:
  enabled: false

auth:
  teleportConfig:
    teleport:
      storage:
        type: cockroachdb
        conn_string: postgres://teleport@${CRDB_FQDN}:26257/teleport_backend?pool_max_conns=20&sslmode=verify-full&sslcert=/var/lib/db-certs/client.teleport.crt&sslkey=/var/lib/db-certs/client.teleport.key&sslrootcert=/var/lib/db-certs/ca.crt

    auth_service:
      enabled: yes
      listen_addr: 0.0.0.0:3025
      cluster_name: ${CLUSTER_NAME}
      proxy_listener_mode: multiplex
    ssh_service:
      enabled: yes
    proxy_service:
      enabled: yes
      web_listen_addr: 0.0.0.0:443
      public_addr: ${CLUSTER_NAME}:443

  extraVolumes:
    - name: db-certs
      secret:
        secretName: cockroach-certs
        defaultMode: 0600
  extraVolumeMounts:
    - name: db-certs
      mountPath: /var/lib/db-certs
      readOnly: true

highAvailability:
  replicaCount: 2
  requireAntiAffinity: true
- Set
{CLUSTER_NAME}to a subdomain of your domain name (e.g.,us-east.teleport.example.com). - Set
{CRDB_FQDN}to the CockroachDB cluster endpoint.
Install the chart:
helm upgrade --install teleport-cluster teleport/teleport-cluster --namespace teleport -f ~/values_teleport_us-east.yaml
After a minute, confirm both the Auth Service and Proxy Service pods are running:
kubectl -n teleport get pods

# NAME                                          READY   STATUS    RESTARTS   AGE
# pod/teleport-cluster-auth-7bd79b87dc-gp5r5    1/1     Running   0          16m
# pod/teleport-cluster-auth-7bd79b87dc-kqm4h    1/1     Running   0          15m
# pod/teleport-cluster-proxy-5945bf8c4b-qpmfp   1/1     Running   0          32m
Teleport cluster running on Kubernetes
Step 4. Set Up DNS Records
The teleport-cluster Helm chart exposes the Proxy Service using a Kubernetes service that sets up an external load balancer with your cloud provider.
Obtain the load balancer address:
kubectl get services/teleport-cluster

# NAME                    TYPE           CLUSTER-IP       EXTERNAL-IP                                                               PORT(S)
# service/teleport-cluster  LoadBalancer   172.20.141.201   a5917404c801e46338fb1acf6126c16f-1390961295.us-east-1.elb.amazonaws.com   443:31487/TCP,...
For each region, create two DNS records:
- A CNAME record
<region>.teleport.example.compointing to your load balancer’s domain name - A wildcard CNAME
*.<region>.teleport.example.comfor web applications registered with Teleport
Verify the cluster is running:
curl https://<region>.teleport.example.com/webapi/ping
Now test that Teleport is using CockroachDB as its storage backend by connecting to the SQL client and inspecting the schema:
cockroach sql --url postgresql://teleport@{crdb-fqdn}:26257/teleport_backend --certs-dir={certs-dir}
SHOW TABLES;
schema_name |   table_name    | type  |  owner   | estimated_row_count
------------+-----------------+-------+----------+--------------------
public      | backend_version | table | teleport |                   0
public      | kv              | table | teleport |                  71
(2 rows)
Teleport creates two tables: backend_version (cluster version and creation timestamp) and kv (access management metadata as key-values with expiration timestamps and revisions).
Step 5. Set Up the Teleport Database Service
Teleport can provide secure access to CockroachDB via the Teleport Database Service, enabling fine-grained access control through Teleport’s RBAC system. The Database Service authenticates to CockroachDB using mutual TLS — CockroachDB trusts the Teleport certificate authority for database clients, eliminating the need for long-lived credentials.
Teleport Database Service agent architecture
Generate a join token for the Database Agent:
tctl tokens add --type=db --format=text
# abcd123-insecure-do-not-use-this
Install the Teleport Kube Agent with the Database Service configuration:
roles: db
proxyAddr: {CLUSTER_NAME}:443
enterprise: true
authToken: {AUTH_TOKEN}
joinParams:
  method: token

databases:
- name: roach
  uri: {CRDB_FQDN}:26257
  protocol: cockroachdb
  tls:
    mode: verify-full
    ca_cert_file: /var/lib/db-certs/ca.crt

extraVolumes:
  - name: db-certs
    secret:
      secretName: cockroach-certs
      defaultMode: 0600
extraVolumeMounts:
  - name: db-certs
    mountPath: /var/lib/db-certs
    readOnly: true
Verify the agent pod is running:
kubectl get pods

# NAME                                          READY   STATUS    RESTARTS   AGE
# pod/teleport-cluster-auth-7bd79b87dc-gp5r5    1/1     Running   0          26m
# pod/teleport-cluster-proxy-5945bf8c4b-qpmfp   1/1     Running   0          22m
# pod/teleport-kube-agent-0                     1/1     Running   0          32s
Step 6. Create a Teleport User
Teleport uses mutual TLS authentication with CockroachDB. First, create a database user with certificate-only auth:
CREATE USER danielle WITH PASSWORD NULL;
Note: The
WITH PASSWORD NULLclause prevents password auth and mandates client certificate authentication.
Now create a local Teleport user with the built-in access and requester roles:
tctl users add danielle --roles=access,requester --db-users="*" --db-names="*"
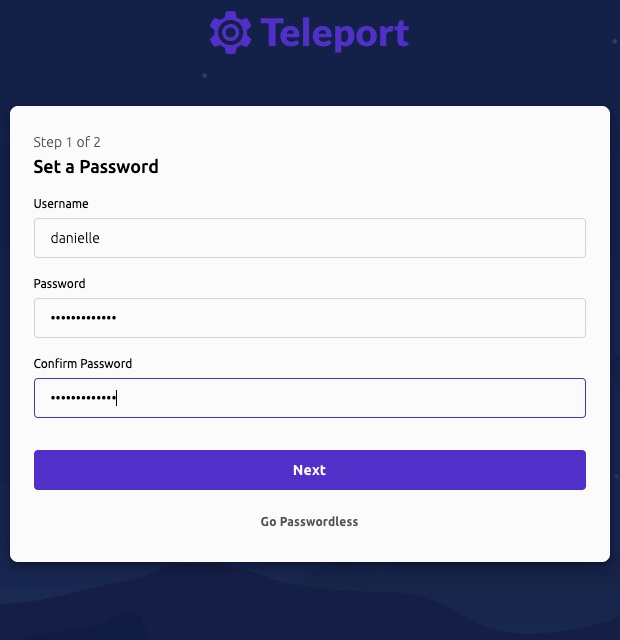
You will receive an invitation link to complete user setup:
Teleport user setup form
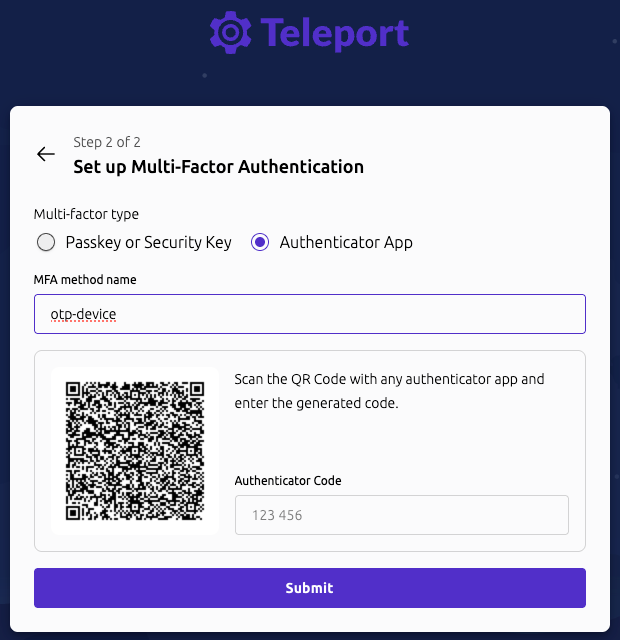
Then associate an authenticator app by scanning the generated QR code:
Teleport MFA QR code setup
Step 7. Set Up Mutual TLS
To finalize the mutual TLS setup, CockroachDB nodes need to trust the Teleport db_client CA so that Teleport users can authenticate as database clients.
Copy your CockroachDB CA cert and append Teleport’s db_client CA:
cp ~/certs/ca.crt ~/certs/ca-client.crt
tctl auth export --type=db-client >> ~/certs/ca-client.crt
Copy ca-client.crt to each CockroachDB node and reload certificates without restarting:
pkill -SIGHUP -x cockroach
Note: Send SIGHUP as the same user that started the
cockroachprocess.
Warning: Do not rotate or replace an existing CockroachDB CA in production.
Step 8. Connect
Sign in to your Teleport cluster and verify database access:
tsh login --proxy=us-east.teleport.example.com --user=danielle
tsh db ls
Connect directly to the CockroachDB cluster through Teleport:
tsh db connect --db-user=danielle roach
You can also access your CockroachDB databases through the Teleport Web UI:
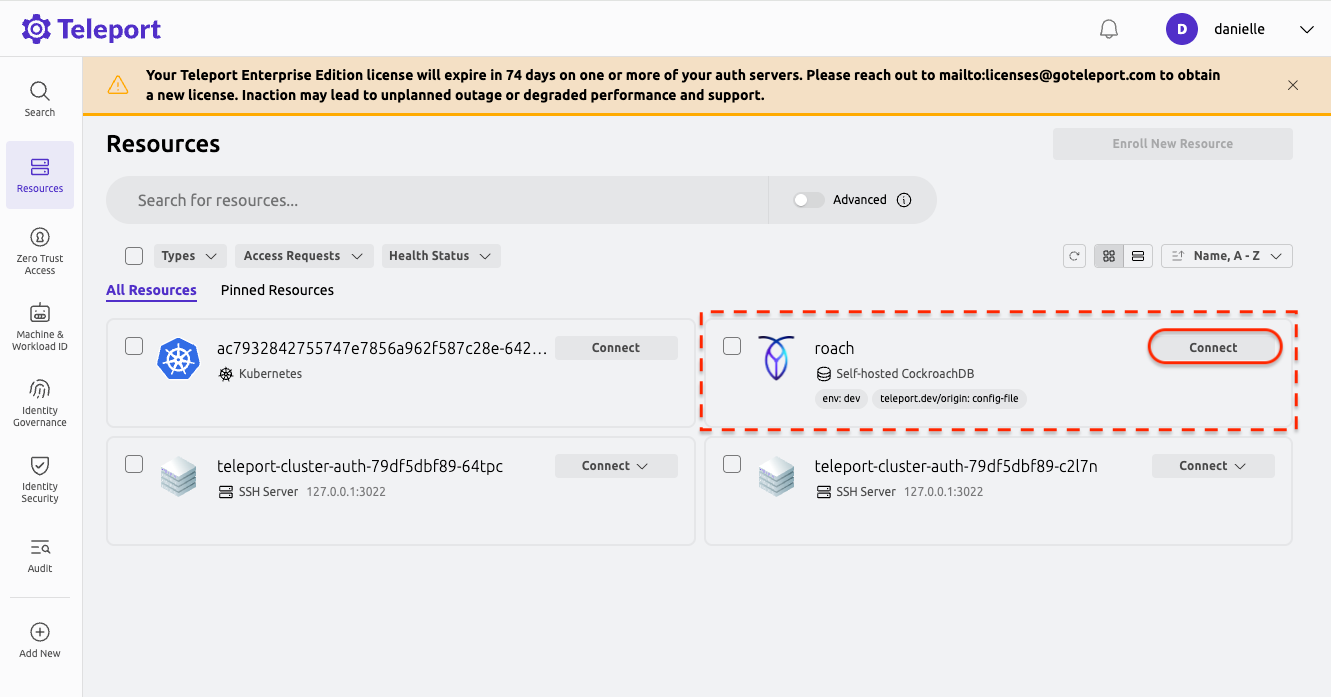
Teleport Web UI showing CockroachDB access
Next Steps
The tests above confirm that each Teleport component in this deployment is properly connected using CockroachDB as the shared data layer. Together, they enable infrastructure access systems that remain correct and available — even in the presence of regional outages or network partitions. You can now begin building fine-grained access control to your infrastructure assets with CockroachDB and Teleport.